Private Network
- The private network used by VM instances can be used to create VM instances. Generally, the private network is an internal network.
- When you use the private network with the flat network type, this private network that serves as a large layer 2 network can directly connect to host networks, and can also reach the Internet.
- When you use the private network with the vRouter network type, this private network can reach the Internet by using a vRouter.
- When you use the private network with the VPC network type, this private network can reach the Internet by using a VPC vRouter.
This topic mainly describes the flat network and the vRouter network types. For more information about VPCs, see VPC.
ZStack Private Cloud supports the ARM vRouter network type.
- Flat network
- A flat network supports multiple network services, including DHCP, EIP, security group, and User Data.
- The network services of the flat network adopt the distributed DHCP and the distributed EIP structure.
- The DHCP service of the flat network also includes the DNS feature.
- vRouter network
- A vRouter network also supports multiple network services, including DHCP, DNS, SNAT, vRouter table, EIP, port forwarding, load balancing, IPsec tunnel, and security group.
- The vRouter network provides multiple network services by mainly using a custom Linux VM instances as a routing device.
- The DHCP service of the vRouter network adopts the distributed DHCP by default.
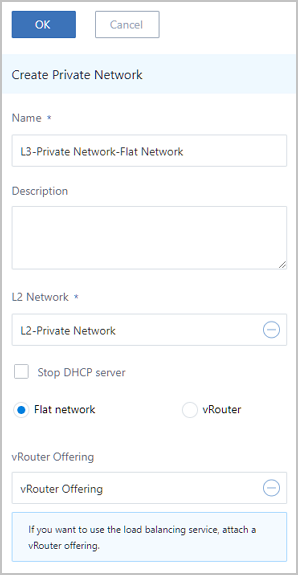
Create Private Network with Flat Network Type
- Name: Enter a name for the private network.
- Description: Optional. Enter a description of the private network.
- L2 Network: Select the corresponding L2 network for
the private network.
 Note: ZStack Private Cloud allows you to create multiple L3 networks by using
an L2 network. However, we do not recommend to do so unless you have
special business requirements.Click the Plus sign (⊕) under the L2 Network field. Then, the Select L2 Network page is displayed on the right. This page has the following two tabs:
Note: ZStack Private Cloud allows you to create multiple L3 networks by using
an L2 network. However, we do not recommend to do so unless you have
special business requirements.Click the Plus sign (⊕) under the L2 Network field. Then, the Select L2 Network page is displayed on the right. This page has the following two tabs:- Default: Display a list of L2 networks that do not have an L3 network attached in the current zone.
- All: Display a list of all L2 networks in the current zone, including the L2 networks that have or not have an L3 network attached.
- Stop DHCP server: Choose whether
to enable the DHCP service.Note:
- By default, this checkbox is not selected, indicating that the DHCP service is enabled, and IP addresses will be automatically allocated to VM instances. In this case, you can customize a DHCP IP address, or let the system randomly specify a DHCP IP address.
- If selected, the DHCP service will be disabled, indicating that VM instances that use this network cannot obtain IP addresses automatically, and need to be configured manually with IP addresses. In this case, you cannot customize the DHCP IP address. In addition, the system cannot randomly specify a DHCP IP address.
- Network Type: Select the flat network.
- The flat network supports various network services, such as DHCP, EIP, load balancing, security group, and User Data.
- If the L2 network is with HarewareVxlanNetwork, the private L3 network can only support the flat network and the related network services, but not the vRouter network.
Note: If an L2 network is a network with the HarewareVxlanNetwork type,
the private network that you created only supports the flat network and
the corresponding network services. In addition, this L2 network with
the HarewareVxlanNetwork type does not support the vRouter
network. - vRouter Offering: Optional. Attach a vRouter offering if your IPv4 flat network must use the load balancing network service.
- Add IP Range: Select a network
address type, including IPv4 and IPv6. Then, add a network range, including
IP range and CIDR.Next, we will introduce 4 types of network range scenario successively as follows.
- IPv4 | IP Range.If you select the IPv4 network address and add the network range via IP Range, set the following parameters:
- Start IP: Enter a start IP address for the network range, such as 172.20.108.100.
- End IP: Enter an end IP address for the network range, such as 172.20.108.200.
- Netmask: Enter a netmask for the network range, such as 255.255.0.0.
- Gateway: Enter a gateway for the network range, such as 172.20.0.1.
- DHCP IP:
Optional. Enter a DHCP IP address as needed, such as
172.20.108.10.Note:
- If you create an L3 network and enable the DHCP service for the first time, or if you add the first IP range for the L3 network of the enabled DHCP service, you can customize the DHCP IP address.
- If the L3 network has a DHCP IP address, you cannot customize the DHCP IP address when you add an IP range.
- The DHCP IP address can be included or excluded on the added IP range. However, the DHCP IP address must be within the CIDR to which the added IP range belongs, and must not be occupied.
- The IP range specified within the start IP address and end IP address cannot contain IP addresses of the link-local address (169.254.0.0/16).
- If not specified, the system will randomly specify an IP address within the IP range that you added.
An IPv4 address with the IP range can be selected, as shown in IPv4 | IP Range.Figure 1. IPv4 | IP Range 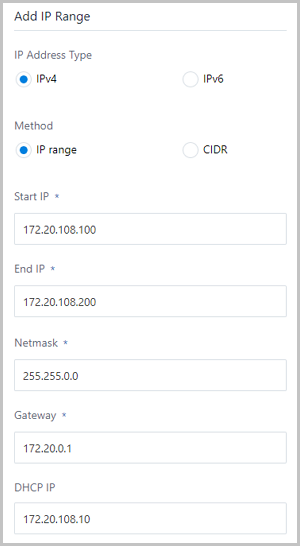
Note: When you add network ranges with IPv4 | IP
Range, note the following:- You must not include the gateway (for example, xxx.xxx.xxx.1), broadcast address (for example, xxx.xxx.xxx.255), and network address (for example, xxx.xxx.xxx.0) in the added IP range.
- The network range of a private network cannot overlap with the public network or management network on a vRouter offering.
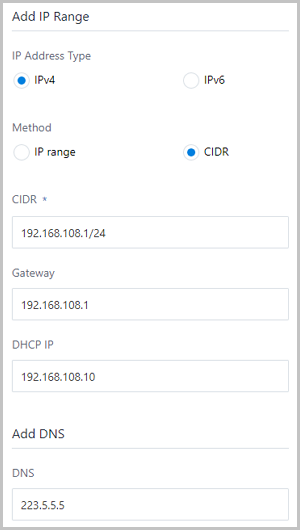
- IPv4 | CIDR.If you select the network address with the IPv4 and add the network range with CIDR, set the following parameters:
- CIDR: Enter a CIDR for the network range, such as 192.168.108.1/24.
- Gateway: Set a gateway, such
as 192.168.108.1.Note:
- The first or the last allowed CIDR IP address can act as a gateway.
- If null, the first IP address that is used by default will serve as a gateway.
- DHCP IP: Optional. Set a DHCP
IP address as needed, such as
192.168.108.10.Note:
- If you create an L3 network and enable the DHCP service for the first time, or if you add the first network range for the L3 network of the enabled DHCP service, you can customize the DHCP IP address.
- If the L3 network has a DHCP IP address, you cannot customize the DHCP IP address when you add the IP range.
- The DHCP IP address can be included or excluded on the IP range that you added. However, the DHCP IP address must not be in conflict with the current CIDR.
- If not specified, the system will randomly specify an IP address within the added IP range.
- The first IP address in a CIDR is deemed as a gateway by default, and cannot serve as a DHCP IP address.
An IPv4 address with the CIDR format can be selected, as shown in Figure 2.Figure 2. IPv4 | CIDR 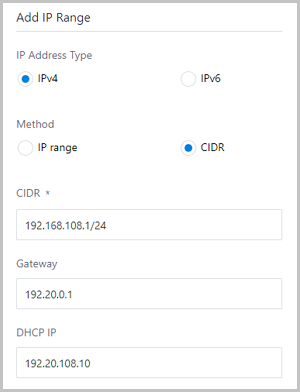
Note: If you add a network range with IPv4 |
CIDR, set the following parameters: - The IP range specified in the CIDR cannot contain IP addresses of the link-local address (169.254.0.0/16).
- The network range of a private network cannot overlap with the public network or management network on a vRouter offering.
- IPv6 | IP Range.If you select the network address with the IPv6 and add the network range with the IP range, set the following parameters:
- Mode: Provide an IP
allocation method. Default method:
Stateful-DHCP.Note:
- Stateful-DHCP: Set a stateful IP
address by using the DHCP protocol.
You can configure both access addresses and other parameters by using the DHCP protocol.
- Stateful-DHCP: Set a stateful IP
address by using the DHCP protocol.
- Start IP: Enter a start IP address for the network range, such as 2000:910A:2222:5498:8475:1111:3900:2002.
- End IP: Enter an end IP address for the network range, such as 2000:910A:2222:5498:8475:1111:3900:2009.
- Prefix Length: Enter a prefix
length for the network range, such as 64.Note: The
prefix length is 64-126. If less than 64, you will
fail to create VM instances.
- Gateway: Enter the gateway for the network range, such as 2000:910A:2222:5498:8475:1111:3900:2001.
- DHCP IP: Optional. Set a DHCP
IP address as needed, such as
2000:910A:2222:5498:8475:1111:3900:2006.Note:
- If you create an L3 network and enable the DHCP service for the first time, or if you add the first IP range for the L3 network of the enabled DHCP service, you can customize the DHCP IP address.
- If the L3 network has a DHCP IP address, you cannot customize the DHCP IP address when you add an IP range.
- The DHCP IP address can be included or excluded on the added IP range. However, the DHCP IP address must be within the CIDR to which the added IP range belongs, and must not be occupied.
- The IP range specified within the start IP address and end IP address cannot contain IP addresses of the link-local address (169.254.0.0/16).
- If not specified, the system will randomly specify an IP address within the IP range that you added.
An IPv6 address with the IP range can be selected, as shown in IPv6 | IP Range.Figure 3. IPv6 | IP Range 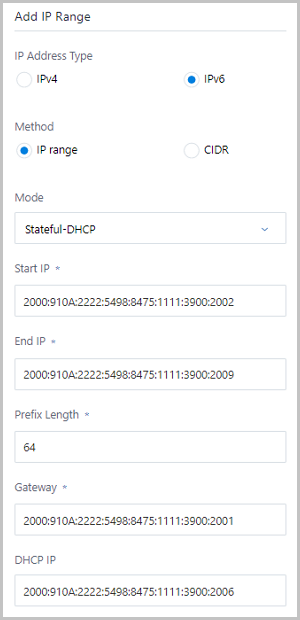
Note: If you add a network range with IPv6 | IP
Range, set the following parameters: - You must not include the gateway (for example, xxxx::1) in the added IP range.
- The IP range specified within the start IP address and end IP address cannot contain IP addresses of the link-local address (fe80::/10).
- The network range of a private network cannot overlap with the public network or management network on a vRouter offering.
- Mode: Provide an IP
allocation method. Default method:
Stateful-DHCP.
- IPv6 | CIDR: If you select the network address with the IPv6 and add the network range with a CIDR, set the following parameters:
- Mode: Provide three types of
IP allocation method: Stateful-DHCP,
Stateless-DHCP, and SLAAC.Note:
- Stateful-DHCP: Set a stateful IP
address by using the DHCP protocol. Default
method: Stateful-DHCP.
You can configure both access addresses and other parameters by using the DHCP protocol.
- Stateless-DHCP: Set a stateless IP
address without using the DHCP protocol.
Access addresses can be automatically derived from the prefix length advertised by routes, while other parameters can be configured by using the DHCP protocol.
- SLAAC: Automatically set the stateless
IP address.
Access addresses can be automatically derived from the prefix length advertised by routes, while other parameters are accompanied in the route advertisement.
- Stateful-DHCP: Set a stateful IP
address by using the DHCP protocol. Default
method: Stateful-DHCP.
- CIDR: Enter CIDR for the network range, such as 234E:2457:3D::/64.
- DHCP IP: Optional. Set the
DHCP IP address as needed, such as
234E:2457:3D::F.Note:
- If you create an L3 network and enable the DHCP service for the first time, or if you add the first network range for the L3 network of the enabled DHCP service, you can customize the DHCP IP address.
- If the L3 network has a DHCP IP address, you cannot customize the DHCP IP address when you add the IP range.
- The DHCP IP address can be included or excluded on the IP range that you added. However, the DHCP IP address must not be in conflict with the current CIDR.
- If not specified, the system will randomly specify an IP address within the added IP range.
- The first IP address in a CIDR is deemed as a gateway by default, and cannot serve as a DHCP IP address.
An IPv6 address with the CIDR format can be selected, as shown in Figure 4.Figure 4. IPv6 | CIDR 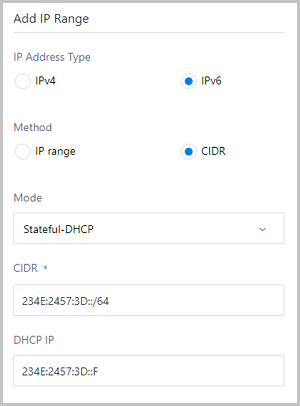
Note: If you add a network range with IPv6 |
CIDR, set the following parameters: - The first IP address in a CIDR has been deemed as a gateway by default.
- The IP range specified in the CIDR cannot contain IP addresses of the link-local address (fe80::/10).
- The network range of a private network cannot overlap with the public network or management network on a vRouter offering.
- Mode: Provide three types of
IP allocation method: Stateful-DHCP,
Stateless-DHCP, and SLAAC.
- IPv4 | IP Range.
- Add DNS: Add a DNS server used
for configuring the DNS service of the L3 network.
- IPv4 type: For example, specify 223.5.5.5, 8.8.8.8 or 114.114.114.114.
- IPv6type: For example, specify 240C::6644 or 240C::6666.
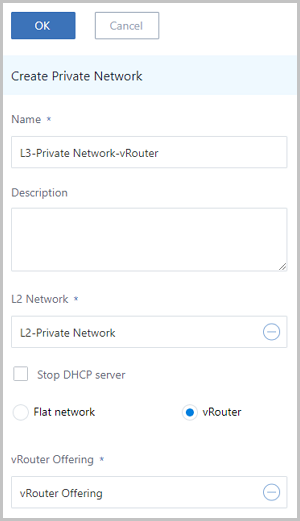
Create Private Network with vRouter Network Type
- Name: Set a name for the private network.
- Description: Optional. Enter a description for the private network.
- L2 Network: Select a corresponding L2 network for the
private network.Note: ZStack Private Cloud allows you to create multiple L3 networks by using
an L2 network. However, we do not recommend to do so unless you have
special business requirements.Click the Plus sign (⊕) under the L2 Network field. Then, the Select L2 Network page is displayed on the right. This page has the following two tabs:
- Default: Display a list of L2 networks that do not have an L3 network attached in the current zone.
- All: Display a list of all L2 networks in the current zone, including the L2 networks that have or not have an L3 network attached.
- Stop DHCP server: Choose whether
to enable the DHCP service.Note:
- By default, this checkbox is not selected, indicating that the DHCP service is enabled, and IP addresses will be automatically allocated to VM instances. In this case, you can customize a DHCP IP address, or let the system randomly specify a DHCP IP address.
- If selected, the DHCP service will be disabled, indicating that VM instances that use this network cannot obtain IP addresses automatically, and need to be configured manually with IP addresses. In this case, you cannot customize the DHCP IP address. In addition, the system cannot randomly specify a DHCP IP address.
- Network Type: Select the vRouter network.Note: If an
L2 network is the network with the HarewareVxlanNetwork type, the
private network that you create only supports the flat network and the
corresponding network services. In addition, this L2 network with the
HarewareVxlanNetwork type does not support the vRouter
network.
- vRouter Offering: Select a vRouter offering that you created.Note:
- If you do not have a vRouter offering in the cloud, create a vRouter offering on the vRouter Offering page.
- For more information about how to create a vRouter offering, see vRouter Offering.
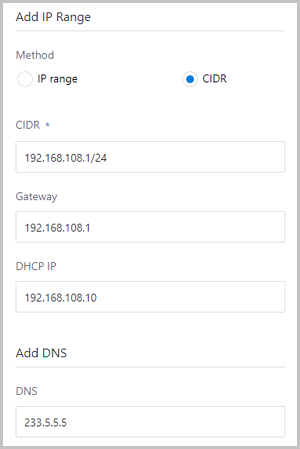
- Add IP Range: Add a network range
for the vRouter network, including IP range and CIDR.
- If you select IP Range, set the following
parameters:
- Start IP: Enter a start IP address for the network range, such as 172.20.108.100.
- End IP: Enter an end IP address for the network range, such as 172.20.108.200.
- Netmask: Enter a netmask for the network range, such as 255.255.0.0.
- Gateway: Enter a gateway for the network range, such as 172.20.0.1.
- DHCP IP:
Optional. Enter a DHCP IP address as needed, such as
172.20.108.10.Note:
- If you create an L3 network and enable the DHCP service for the first time, or if you add the first IP range for the L3 network of the enabled DHCP service, you can customize the DHCP IP address.
- If the L3 network has a DHCP IP address, you cannot customize the DHCP IP address when you add an IP range.
- The DHCP IP address can be included or excluded on the added IP range. However, the DHCP IP address must be within the CIDR to which the added IP range belongs, and must not be occupied.
- The IP range specified within the start IP address and end IP address cannot contain IP addresses of the link-local address (169.254.0.0/16).
- If not specified, the system will randomly specify an IP address within the IP range that you added.
Note: When you add a network range with IP Range, note
the following:- You must not include the gateway (for example, xxx.xxx.xxx.1), broadcast address (for example, xxx.xxx.xxx.255), and network address (for example, xxx.xxx.xxx.0) in the added IP range.
- The network range of a private network cannot overlap with the public network or management network on a vRouter offering.
- If you select CIDR, set the following
parameters:
- CIDR: Enter a CIDR for the network range, such as 192.168.108.1/24.
- Gateway: Set a gateway, such
as 192.168.108.1.Note:
- The first or the last allowed CIDR IP address can act as a gateway.
- If null, the first IP address that is used by default will serve as a gateway.
- DHCP IP: Optional. Set a DHCP
IP address as needed, such as
192.168.108.10.Note:
- If you create an L3 network and enable the DHCP service for the first time, or if you add the first network range for the L3 network of the enabled DHCP service, you can customize the DHCP IP address.
- If the L3 network has a DHCP IP address, you cannot customize the DHCP IP address when you add the IP range.
- The DHCP IP address can be included or excluded on the IP range that you added. However, the DHCP IP address must not be in conflict with the current CIDR.
- If not specified, the system will randomly specify an IP address within the added IP range.
- The first IP address in a CIDR is deemed as a gateway by default, and cannot serve as a DHCP IP address.
Note: When you add a network range with CIDR, note the
following:- The IP range specified in the CIDR cannot contain IP addresses of the link-local address (169.254.0.0/16).
- The network range of a private network cannot overlap with the public network or management network on a vRouter offering.
- If you select IP Range, set the following
parameters:
- Add DNS: Add a DNS server used for configuring the DNS service of an L3 network, such as 223.5.5.5, 8.8.8.8, or 114.114.114.114.
- More Settings: Support advanced settings for the
vRouter offering in the vRouter | IP Range scenario.
- Router Interface IP: Optional. Set a dual
gateway for the vRouter by configuring the router interface IP address.Note:
- When you create a vRouter network and add a network range with the vRouter | IP Range, you can set a dual gateway for the vRouter by configuring the router interface IP address. Doing so will achieve better distributed traffics and improve the network flexibility and stability.
- A router interface IP address cannot overlap with the IP range on the basic settings, but can interconnect with the gateways in the basic settings.
- After you set the router interface IP address, configure the corresponding policy route on switches so that the scenario can work properly.
- Router Interface IP: Optional. Set a dual
gateway for the vRouter by configuring the router interface IP address.
Private Network Operations
- Create private network: Create a new private network.
- Add network range: Add a new IP range for the private network.
- Share to all: Share the private network to all projects or regular accounts. Make sure that you have installed the License of the Enterprise Management module.
- Recall from all: Recall the private network from all projects or regular accounts. You can make these projects or regular accounts invisible. Make sure that you have installed the License of the Enterprise Management module.
- Delete: Delete the private network.Note: If you delete the private network,
VM NICs that use this private network will be deleted as
well.
- Attach vRouter offering: Attach a vRouter offering to the vRouter network or
flat network.
- To attach a new vRouter offering, assume that you have a vRouter under a vRouter network or flat network. Firstly, attach a new vRouter offering to the vRouter network or flat network. Then, deleted the existed vRouter under the vRouter network or flat network. Finally, rebind a VM NIC to a listener whose load balancer has attached the vRouter network or flat network or create a VM instance by using the vRouter network or flat network.
- If you have not attached a vRouter offering to a vRouter network, a default vRouter offering will be used to create a vRouter.
- If have not created a vRouter with a flat network, attach a vRouter offering to the flat network in advance before creating a vRouter. This vRouter will enable you to use load balancing services.
- Detach vRouter offering: Detach a vRouter offering from the vRouter network
or flat network.Note:
- If you need to change the CPU or memory for a vRouter, you are not required to detach the vRouter offering. We recommend that you change the CPU or memory for a vRouter by going to the related vRouter details page.
- After you detach a vRouter from a vRouter network, the default vRouter offering will be used to create a vRouter without affecting your business.
- After you detach a vRouter offering from a flat network, notice
that:
- If you have not created a vRouter with the flat network, detaching a vRouter offering will not enable you to use load balancing services.
- If you have created a vRouter with the flat network, detaching a vRouter offering will not affect your normal use of load balancing services.