This topic describes how to add a Ceph primary storage in the ZStack
Private Cloud UI.
Add Ceph Primary Storage
In the navigation pane of the ZStack Private Cloud UI, choose Hardware > Primary Storage. On the Primary Storage page, click
Add Primary Storage. On the displayed Add
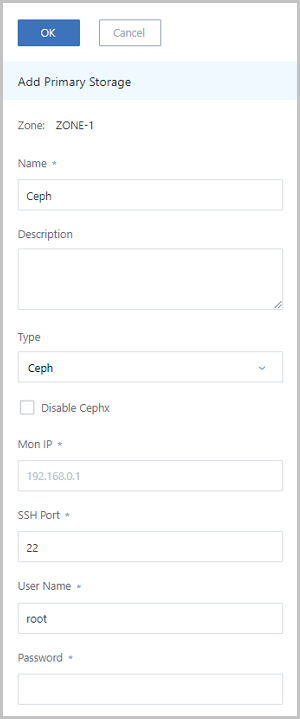
Primary Storage page, set the following parameters:
Zone: By default, the current zone is displayed.
Name: Enter a name for the primary storage.
Description: Optional. Enter a description for the
primary storage.
Type: Select Ceph.
Disable Cephx: Determine whether to enable Ceph authentication.
Note:
By default, this checkbox is not selected, indicating that Ceph
authentication is enabled.
If selected, Ceph authentication is disabled.
If the network of the storage node and the compute node is
relatively safe, you can disable Cephx to avoid Ceph
authentication failure.
Make sure that the key authentication of the Ceph storage is
consistent with this option. If Cephx is not disabled for the
Ceph storage, selecting this checkbox here may cause VM creation
failure.
Mon IP: Enter the IP address of the Ceph
monitor.
SSH Port: Enter the SSH port No. of the Ceph monitor.
Default port: 22.
User Name: Enter the user name of the Ceph
monitor.
Password: Enter the password that corresponds to the
user name of the Ceph monitor.
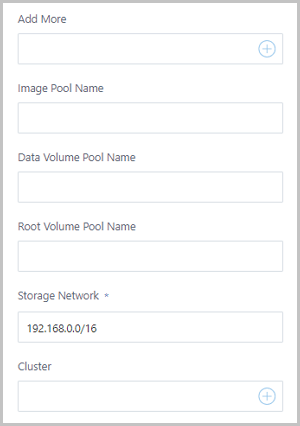
Add More: Click the plus sign (+) to add more Ceph
monitors.
Image Pool Name: Enter the name of an image pool. If
not specified, the system will automatically create an image pool.
Data Volume Pool Name: Enter the name of a data
volume pool. If not specified, the system will automatically create a data
volume pool.
Root Volume Pool Name: Enter the name of a root
volume pool. If not specified, the system will automatically create a root
volume pool.
Storage Network: Indicate the storage network
specified for the shared storage. The storage network can be shared by the
management network of the management node.
Note:
You can use this storage network to check the health status of a
VM instance.
We recommend that you plan an independent storage network in
advance to avoid potential risks.
Cluster: Select a cluster to mount the primary
storage.
As shown in Figure 1.Figure 1. Add Ceph Primary Storage
Add Ceph Monitor
Generally, a Ceph cluster will be configured with multiple Ceph monitors (Ceph Mon).
The configuration method is as follows:
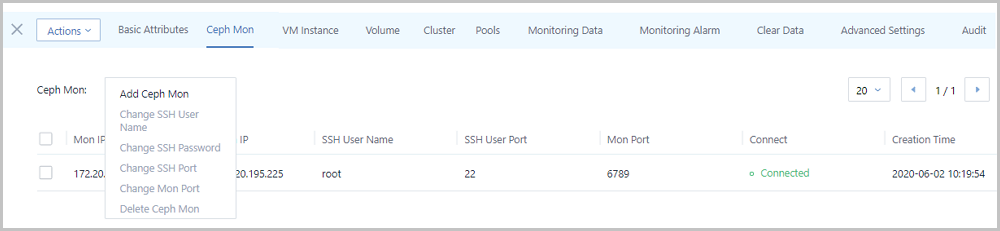
On the Primary Storage page, click on the name of a
Ceph primary storage. On the displayed details page, click Ceph
Mon. Then, the Ceph Mon tab page is
displayed, as shown in Figure 2.Figure 2. Ceph Mon
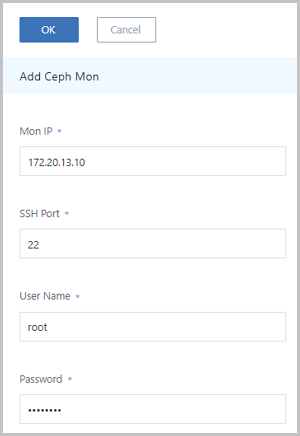
Click Actions > Add Ceph Mon next to Ceph Mon. On the displayed
Add Ceph Mon page, set the following parameters:
Mon IP: Enter the IP address of the Ceph
mon.
SSH Port: Enter the SSH port of the Ceph mon.
Default port: 22.
User Name: Enter a user name for the Ceph
mon.
Password: Enter a password that corresponds
to the user name of the Ceph mon.
On the wizard page, we recommend that you add only one Ceph mon
to quickly finish the basic initialization. You can add other
Ceph mons on the primary storage page.
If you are not familiar with the configuration of Ceph, we
recommend that you select other primary storage types.
 Note:
Note: