In the navigation pane of the ZStack Private
Cloud UI, choose Resource Pool > Instance Offering. On the Instance Offering page, click
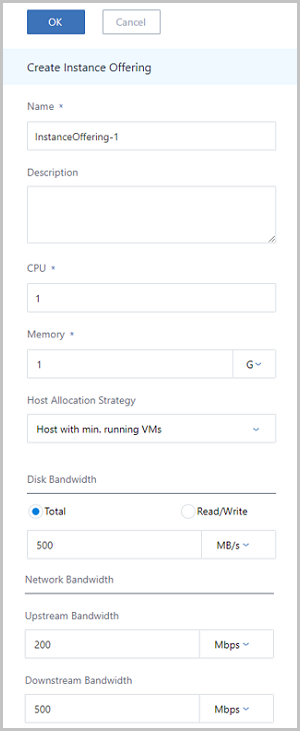
Create Instance Offering. On the displayed Create
Instance Offering page, set the following parameters:
Name: Enter a name for the instance offering.
Description: Optional. Enter a description for the
instance offering.
CPU: Set the number of CPU cores.
Note: Currently, a VM
instance can have up to 240 CPU cores. You can set the number of CPU cores
as needed.
Memory: Set the memory size for your VM instance. Unit:
MB | GB | TB.
Host Allocation Strategy: When you
create a VM instance by using this instance offering, the system will allocate a
host for the VM instance according to the corresponding host allocation
strategy. Default strategy: Host with min. running VMs. Each strategy is
described as follows:
Host with min. running VMs: The host with the minimum number of
running VM instances will be chosen to create VM instances.
Host with min. CPU utilization: The host with the minimum CPU
utilization will be chosen to create VM instances.
Note:
The system collects the host CPU loads over a period of
time, calculates the average CPU usage during this period,
and then selects the host with the lowest CPU usage to
create VM instances.
By default, the data collection cycle is 10 minutes. To
change the collection cycle, go to Settings > Global Settings > Advanced, locate Minimum interval of Host
collecting CPU usage, and click the
Edit icon.
Host with min. memory utilization: The host with the minimum
memory utilization will be chosen to create VM instances.
Note:
The system collects the host memory loads over a period of
time, calculates the average memory usage during this
period, and then selects the host with the lowest memory
usage to create VM instances.
By default, the data collection cycle is 10 minutes. To
change the collection cycle, go to Settings > Global Settings > Advanced, locate Minimum interval of Host
collecting Memory usage, and click the
Edit icon.
Host with max. running VMs: The host with the maximum number of
running VM instances will be chosen to create VM instances. To use this
option, you need to set the maximum number of VM instances that can run
on a host. Then, the system selects the host that meets the requirements
to create VM instances. If no host is available, you will fail to create
a VM instance.
Host where the VM located last time: When you restart a stopped
VM instance, the system selects the host where the VM was running last
time. If you start a new VM instance for the first time, the system
selects a host randomly.
Random allocation: The system randomly selects a host to create
VM instances.
Strategy Pattern: This parameter is
required if you set the host allocation strategy to Host with min. CPU
utilization or Host with min. memory utilization. Options:
Allocation Strategy (soft) | Allocation Strategy (hard).
If the cloud can query the host load information, the cloud creates VM
instances according to the host allocation strategy.
If the cloud cannot query the host load information, the cloud creates
VM instances according to the strategy pattern.
Allocation strategy (soft): The cloud randomly allocates a host
with sufficient resources to create VM instances without
considering the host allocation strategy.
Allocation strategy (hard): The cloud uses the host allocation
strategy forcibly, which might cause VM creation failure.
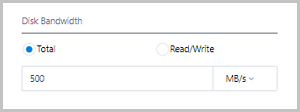
Disk Bandwidth: Optional. Set the
upper limit of the root volume I/O bandwidth for a VM instance. If not
specified, the I/O bandwidth is not limited. Unit: MB/s | GB/s | TB/s.
The disk bandwidth parameter has the following two
options:
Total:
If you select
Total, set the upper limit of the
total read and write speed of the VM root volume. The value must
be an integer. Unit: MB/s | GB/s. Value range: 1 MB/s–100
GB/s.
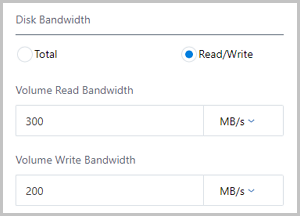
If you select
Read/Write, set the following
parameters:
Volume Read Bandwidth: Set the
upper limit of the read speed of the VM root volume. The
value must be an integer. Unit: MB/s | GB/s. Value
range: 1 MB/s–100 GB/s.
Volume Write Bandwidth: Set the
upper limit of the write speed of the VM root volume.
The value must be an integer. Unit: MB/s | GB/s. Value
range: 1 MB/s–100 GB/s.
As shown in Figure 2.Figure 2. Read/Write Bandwidth
Network Bandwidth: Set the upper limit of the VM network
bandwidth. The value must be an integer. Unit: Kbps | Mbps | Gbps. Value range:
8 Kbps–100 Gbps.
Upstream Bandwidth: Optional.
Set the upper limit of the network bandwidth for uploading from a VM
instance. If not specified, the upstream bandwidth is not limited. The
value must be an integer. Unit: Kbps | Mbps | Gbps. Value range: 8
Kbps–100 Gbps.
Downstream Bandwidth:
Optional. Set the upper limit of the network bandwidth for downloading
from a VM instance. If not specified, the downstream bandwidth is not
limited. The value must be an integer. Unit: Kbps | Mbps | Gbps. Value
range: 8 Kbps–100 Gbps.
Note: Before you make any settings, make sure that you fully understand the
configurations of the disk bandwidth and network bandwidth. Otherwise, you
might fail to upload files to or download files from a VM
instance.
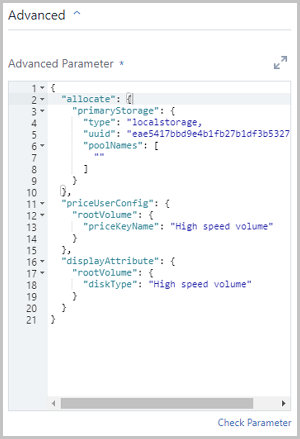
Advanced: You can configure advanced parameters in JSON
format to customize the disk performance.
Sample:
{
  "allocate": {
    "primaryStorage": {
      "type": "Enter the primary storage type. Options: Ceph | LocalStorage | NFS | SharedBlock.",
      "uuid": "Enter the primary storage UUID.",
      "poolNames": [
        "Enter the name of the Ceph pool. If the primary storage type is not Ceph, delete the poolNames configuration."
      ]
    }
  },
  "priceUserConfig": {
    "rootVolume": {
      "priceKeyName": "Customize the billing name of the root volume. The advanced parameters of the pricing list must be consistent with this field. Otherwise, the related billing metrics cannot be generated."
    }
  },
  "displayAttribute": {
    "rootVolume": {
      "diskType": "Customize the display type of the root volume. This field is displayed on the details page of the VM instance."
    }
  }
}
The
sample above contains three configurations:
Configure the primary storage of the root
volume.
"allocate": {
    "primaryStorage": {
      "type": "Enter the primary storage type. Options: Ceph | LocalStorage | NFS | SharedBlock.",
      "uuid": "Enter the primary storage UUID.",
      "poolNames": [
        "Enter the name of the Ceph pool. If the primary storage type is not Ceph, delete the poolNames configuration."
      ]
    }
  }
type: Enter the primary storage type.
Options: Ceph | LocalStorage | NFS | SharedBlock. If the
type is Ceph, you can specify a Ceph pool.
uuid: Enter the primary storage
UUID.
poolNames: Enter the name of the Ceph
pool. If the primary storage type is not Ceph, delete the
poolNames configuration.
Note: If no primary storage is specified, delete all the
preceding codes.
Configure the billing type of the root
volume.
"priceUserConfig": {
    "rootVolume": {
      "priceKeyName": "Customize the billing type of the root volume. The advanced parameters of the pricing list must be consistent with this field. Otherwise, the related billing metrics cannot be generated."
    }
  }
priceKeyName: Customize the billing type
of the root volume. The advanced parameters of the pricing
list must be consistent with this field. Otherwise, the
related billing metrics cannot be generated.
Note: If no billing is required, delete all the preceding
codes.
Configure the display attributes of the root
volume.
"displayAttribute": {
    "rootVolume": {
      "diskType": "Customize the display type of the root volume. This field is displayed on the details page of the VM instance and the root volume."
    }
  }
rootVolume: Customize the display name of
the root volume. This field is used for display on the
details page. You can configure multiple attributes in the
key-value format.
Note: If no special display is required, delete all the
preceding codes.
As shown in Figure 3.
Click OK to finish creating the instance offering.Figure 3. Create Instance Offering
 Note: Currently, a VM
instance can have up to 240 CPU cores. You can set the number of CPU cores
as needed.
Note: Currently, a VM
instance can have up to 240 CPU cores. You can set the number of CPU cores
as needed.