Network Bonding (Optional)
This topic mainly describes the configuration method of the network bonding. If you want to install and deploy ZStack in your real production environments, we recommend that you use the network bonding method to configure your networks. If you use the cloud for POC test only, skip this topic.
The network bonding has the following two configuration methods: command line and TUI.
Command Line Method
# Create a link aggregation virtual interface according to the LACP mode.
zs-bond-lacp -c [bond-name]
zs-bond-lacp -c bond0

# Create another link aggregation virtual interface according to the active-backup mode.
zs-bond-ab -c [bond-name]
zs-bond-ab -c bond0

# Bind the physical interface to the link aggregation interface.
zs-nic-to-bond -a [bond-name] [nic-name]
zs-nic-to-bond -a bond0 eth0

# Create a VLAN interface.
zs-vlan -c [nic-name] [vlan]
zs-vlan -c bond0 10

# Create a network bridge, and configure the network IP address for the network bridge.
zs-network-setting -b [interface] [ipaddress] [netmask] [gateway]
zs-network-setting -b bond0.10 192.168.1.10 255.255.255.0 192.168.1.1
TUI Method
- Configure NICs.On the installation summary page, click NETWORK & HOST NAME. Then, the main page of the NIC configuration is displayed, as shown in Main Page of NIC Configuration.
- Select the NIC that you need to configure, such as eth0.
- Enable the NIC by selecting On.
- Check the DHCP address that you have obtained.
Figure 1. Main Page of NIC Configuration 
- Add a Bond device.Click the plus sign (+) at the lower left, select Bond from the prompted Add device drop-down list, and click Add, as shown in Add a Bond Device.
Figure 2. Add a Bond Device 
- Configure Bond.You need to manually make two configurations as follows on the Bond tab of the prompted Editing Bond connection 1 page, as shown in the Configure Bond.
- Add: Add Bond Slave, as shown in Add Bond Slave.
- Mode: Select the Bond mode, as shown in Select Bond Mode.
Figure 3. Configure Bond 
- Add Bond Slave.
- On the Bond tab, click Add to add Bond Slave, as
shown in Add Bond Slave.
Figure 4. Add Bond Slave 
- On the displayed Choose a Connection Type page,
select a connection type for the Bond Slave, such as
Ethernet, and click
Create..., as shown in Select
Connection Type for Bond Slave.
Figure 5. Select Connection Type for Bond Slave 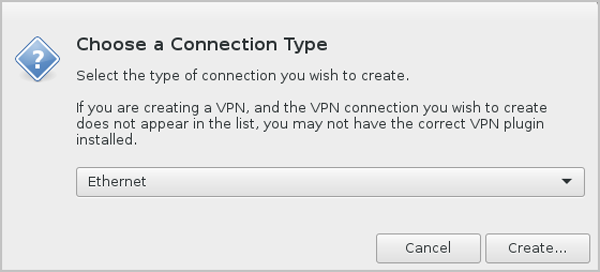
- On the Ethernet tab of the Editing bond0
slave 1 page, select the Slave device that needs to be
bound from the Device drop-down list, such as
eth0 (the corresponding MAC address). On the
Ethernet tab, you can use the default settings
or customize your settings as needed. Finally, click
Save, as shown in Select
Bond Slave Device.
Figure 6. Select Bond Slave Device 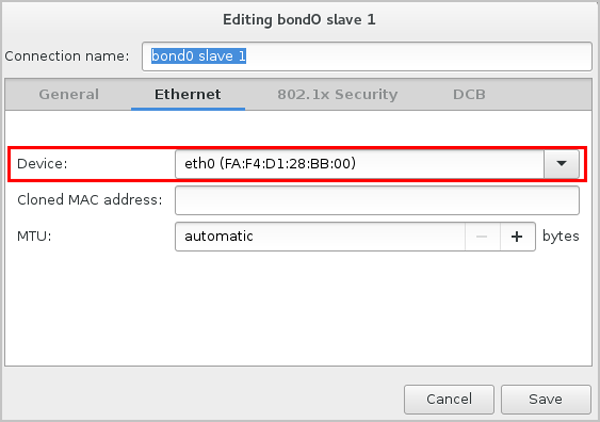
- So far, Bond Slave is added successfully.
- On the Bond tab, click Add to add Bond Slave, as
shown in Add Bond Slave.
- Select the Bond mode.
From the Mode drop-down list of the Bond tab, select the Bond mode as need, such as Active backup. On the Bond tab, you can use the default settings or customize your settings as needed. Finally, click Save, as shown in Select Bond Mode.
Figure 7. Select Bond Mode 
- Disable the IPv4 settings of Bond Slave.
- Go back to the main page of the NIC configuration, select Bond Slave
such as eth0, and click Configure..., as shown in
Open
Configuration Page of Bond Slave.
Figure 8. Open Configuration Page of Bond Slave 
- On the IPv4 Settings tab in the Editing
eth0 page, select Disabled from
the Method drop-down list, and click
Save, as shown in Disable
IPv4 Settings of Bond Slave.
Figure 9. Disable IPv4 Settings of Bond Slave 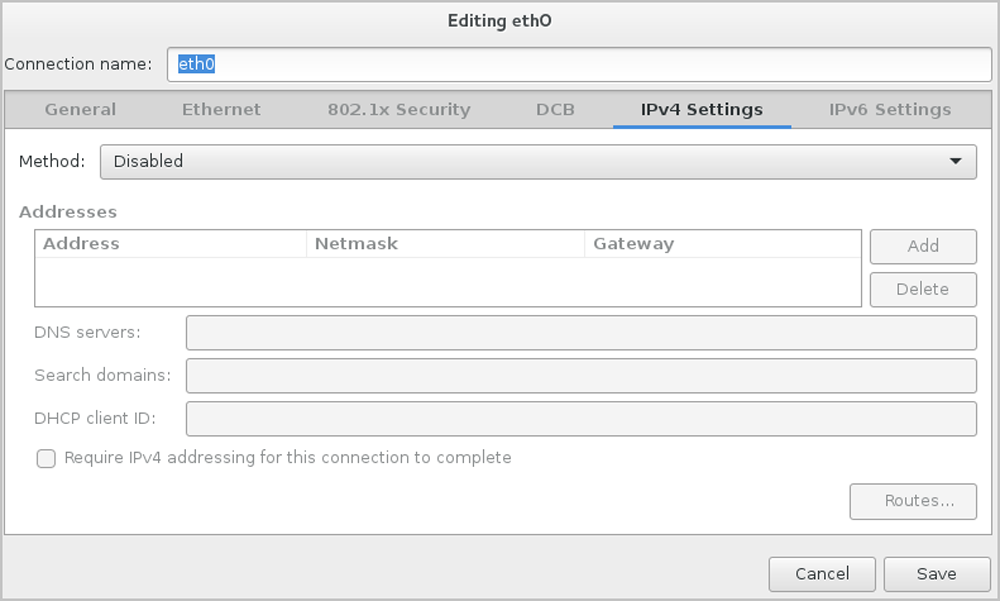
- Go back to the main page of the NIC configuration, select Bond Slave
such as eth0, and click Configure..., as shown in
Open
Configuration Page of Bond Slave.
- Complete the network bonding.
As shown in Complete Network Bonding.
 Note:
Note:
To check Bond configuration options, verify that you have selected On and configured the IP address. At the same time, make sure that Bond Slave such as eth0 has been enabled by selecting On. Or otherwise, you might fail to install ZStack properly.
Figure 10. Complete Network Bonding 
- If the Bond device cannot obtain DHCP addresses, you need to manually configure
the static addresses of the Bond device.
- On the Main Page of NIC Configuration, select Bond (bond0), and click Configure... to open the Bond configuration page, as shown in Configure Static IP Address of Bond Device.
- Go to the IPv4 Settings tab of the Bond device.
- From the Method drop-down list, select Manual to make manual configurations.
- Click Add to add new configuration items.
- Configure the NIC address information as needed.
- Click Save to save your configurations.
Figure 11. Configure Static IP Address of Bond Device 
- Configure the automatic connection for the Bond device.
- On the Main Page of NIC Configuration, select Bond (bond0), and click Configure... to open the Bond configuration page, as shown in Configure Automatic Connection for Bond.
- Go to the General tab.
- Make sure you selected Automatically connect to this network when it is available.
- Click Save to save your settings.
Figure 12. Configure Automatic Connection for Bond 
- So far, we have introduced the network configuration method based on the network bonding.