

_ZStack's [system testing](http://en.wikipedia.org/wiki/System_testing) system runs test cases in real hardware environment; like integration testing, the system testing is full automated and covers aspects of functional tests, stress tests, and performance tests._
Overview
Despite the integration testing system we introduced in The Automation Testing System 1: Integration Testing is powerful to expose a large proportion of bugs in the development process, it has inherent weaknesses. First, as the test cases use simulators, they cannot test real scenarios, for example, testing creating a VM on a physical KVM host. Second, the integration test cases focus on testing a single scenario in a simple, artificial environment; for example, still the creating VM case, it may only deploy a minimal environment having one host, one L3 network that just meets the requirement for creating a VM. These weaknesses, however, are deliberate because we want developers can quickly and easily write cases when they develop a new feature, it's a tradeoff we have to take.
System testing, which aims to test the whole software in a real, complex environment, compensates integration testing naturally. ZStack's system testing system is designed for two goals:
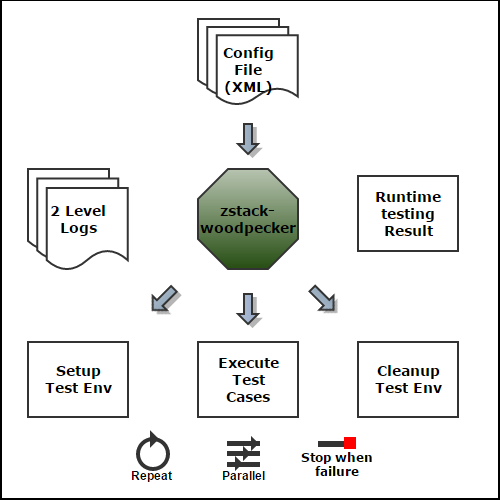
Complex scenario: scenarios should be more complex than the real world use cases, to test limits of the software. For example, the attaching/detaching volume case will continuously and repeatedly attach/detach volumes to VMs in a very fast manner that humans cannot do with their hands.Easy to write and maintain test cases: just like integration testing system, the system testing system takes over most boring, repeating tasks from testers, letting testers write cases efficiently.The system testing system is a Python project named as zstack-woodpecker and is made up of three parts:
Testing Framework: a framework managing all test cases and providing necessary libraries, utilities.Environment deploying tool: a tool that can deploy an environment from XML configuration file; it's very similar to theDeployer in integration testing system.Modularized test cases: test cases are highly modularized and are covering functional test, performance test, and stress test.System Testing
zstack-woodpecker is created all by ourselves; before deciding to reinvent the wheel, we tried popular Python testing frameworks likenose and finally selected to create a new tool that fits our interests best.
Suite Configuration
Like all other testing frameworks, a test suite in zstack-woodpecker starts with suite setup, ends with suite teardown, and has test cases among them. The suite setup and suite teardown are actually two special cases that the suite setup is responsible for preparing the environment needed by test cases followed, and that the suite teardown is responsible for cleaning up the environment when all cases finish. A typical test suite configuration file looks like:
 <integrationTest>
    <suite name="basic test" setupCase="suite_setup.py" teardownCase="suite_teardown.py" parallel="8">
        <case timeout="120" repeat="10">test_create_vm.py</case>
        <case timeout="220">test_reboot_vm.py</case>
        <case timeout="200">test_add_volume.py</case>
        <case timeout="200">test_add_volume_reboot_vm.py</case>
        <case timeout="400">test_add_multi_volumes.py</case>
        <case timeout='600' repeat='2' noparallel='True'>resource/test_delete_l2.py</case>
    </suite>
</integrationTest>
Readers with sharp eyes may have noticed some parameters that are not seen in other testing frameworks. The first one is thetimeout; every test case can define its timeout and if it cannot finish in the period it will be marked as timeout in the final result. The second one is repeat that allows you to specify how many times the case should run within the suite. The third one that is also the killer one is parallel that allows tester to set the parallelism level of the suite; this is the key feature that makes zstack-woodpecker runs test cases very fast; in the above example the parallel is set to 8, that means there will be at most 8 cases running simultaneously; this not only speeds up running cases but also creates a complex scenario that simulates users carrying out different tasks sharing the same environment. However, not all cases can be executed simultaneously; in our example the casetest_delete_l2.py will delete L2 networks on which are relied by other cases, so it cannot be executed while other cases are running; this is the situation that the fourth parameter noparallel plays its role; once it's set to True, the case will be executed lonely and no other cases can run at the same time.
Command Line Tool
zstest.py is a command line tool that helps testers control the testing framework, doing jobs like starting test suite, listing test cases and so forth. zstest.py provides plenty of options assisting testers simplifying their work. A couple of options, which we use in our daily testing, are particular useful as follows.
Testers can retrieve available test cases by option -l, for example:
./zstest.py -lit will show results like:
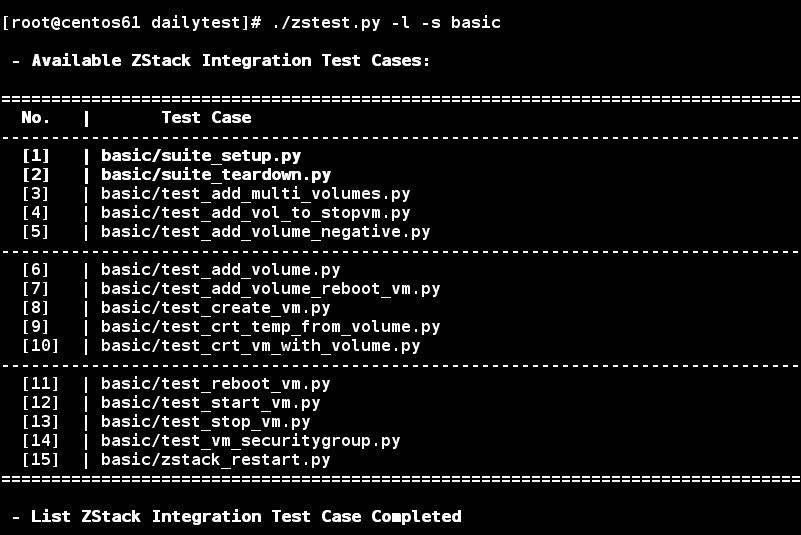
The test suite name is the first level folder name of test cases; for instance, in above picture you see lots of cases beginning with basic(e.g. basic/test_reboot_vm.py), yes the basic is the test suite name. Testers can start a suite by option -s, using full suite name or part of suite name as long as it's unique, for example:
./zstest.py -s basicor
./zstest.py -s ba
Testers can also selectively execute cases using their names or IDs, with the option -c; for example:
./zstest.py -c 1,6or
./zstest.py -c suite_setup,test_add_volume.pyremember you need to run the suite setup case suite_setup.py as the first case, unless you have done it manually.
As a test suite will execute all cases, clean up the environment, and send out a result report, testers sometimes may want to stop the suite and keep the environment when a case fails, so they can look into the failure and debug; option -n and -S are made for this; -ninstructs testing framework not to clean up the environment while -S asks it to skip cases not executed; for example:
./zstest.py -s virutalrouter -n -SBesides, the option -b can pull the latest source code and build a brand new zstack.war, it's particularly useful in nightly test that is supposed to test newest code:
./zstest.py -s virutalrouter -bOnce all cases finish, a report is generated and printed out on the screen:
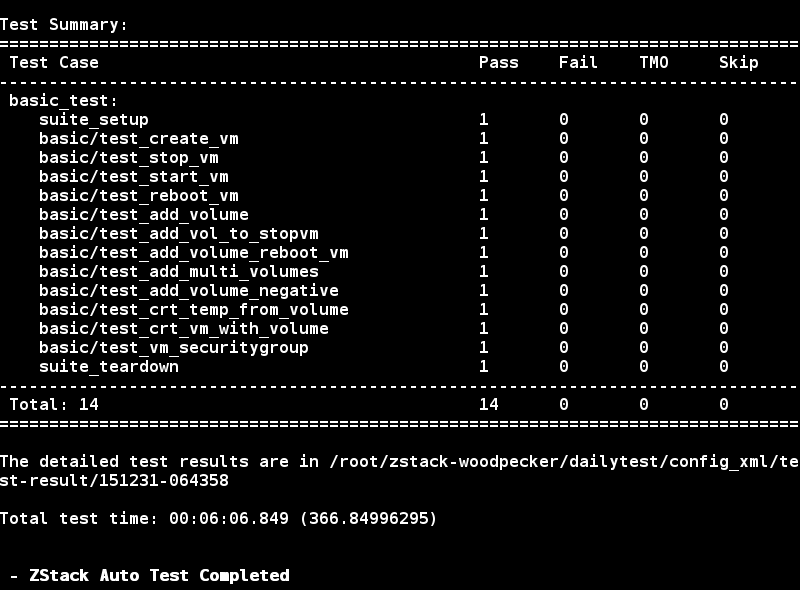
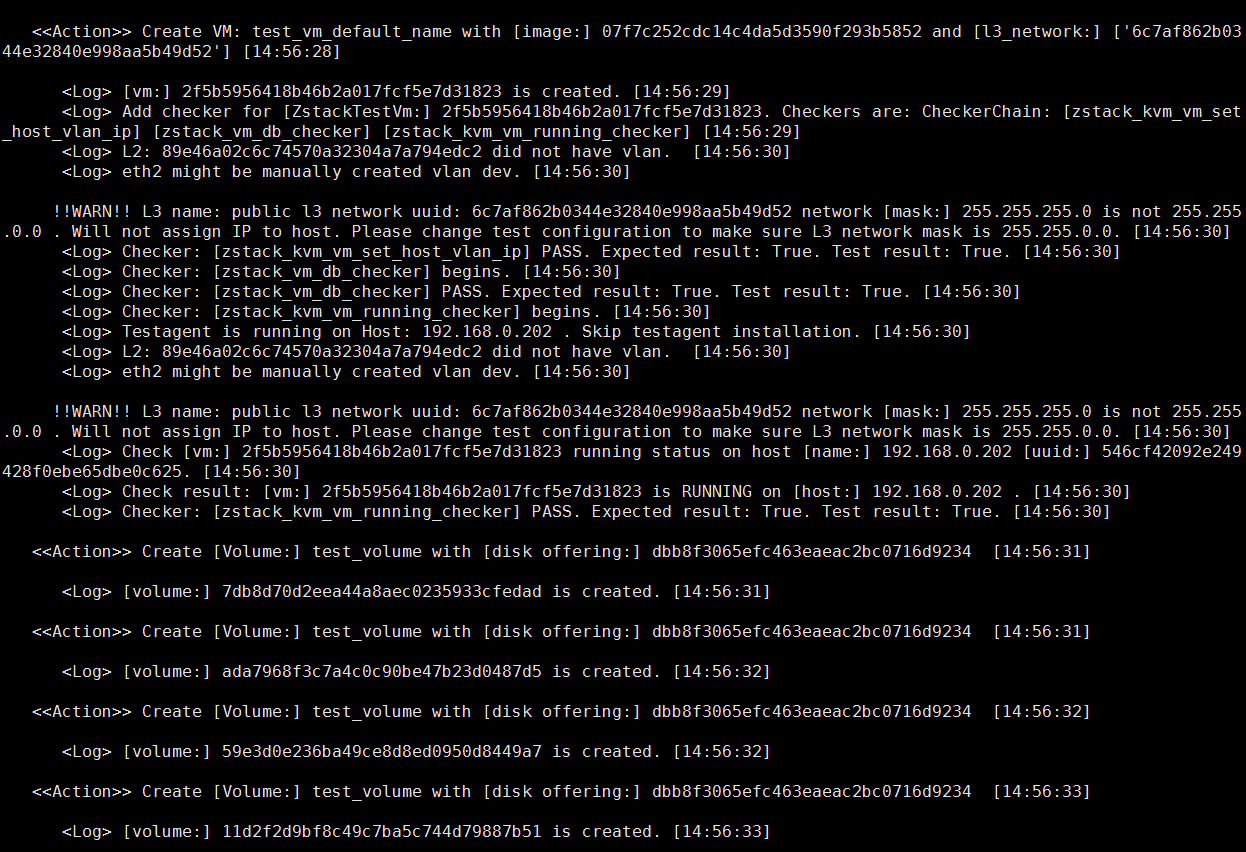
The testing framework will keep all logs and will directly print out the absolute path to each failure log if there are any. In addition to normal logs that record verbose details, there is a special log called action log that records information about every API call; because it's the log purely about API, we can easily root cause a failure without being distracted by testing framework logs. Besides, it's an important tool that can automatically generate a new case to replay the failure, this is the magic weapon we use to debug failures in Model-based testing that every case executes APIs randomly; you can check out details in[The Automation Testing System 3: Model-based Testing](http://www.zstack.io/support/blog/2017/0223/876.html). A snippet of action log is like:
Environment Deploying Tool
Similar to the integration testing, the frequent and repeated task for every test case is preparing the test environment; for example, case testing creating VM needs to setup dependent resources like zone, cluster, host and so on. zstack-woodpecker leverages zstack-cli, which is the command line tool of ZStack to deploy testing environment from an XML configuration file; for example:
zstack-cli -d zstack-env.xmlthe format of XML configuration file is similar to what integration testing uses; a snippet of the configuration is like:
...
  <zones>
    <zone name="$zoneName" description="Test">
      <clusters>
        <cluster name="$clusterName" description="Test"
          hypervisorType="$clusterHypervisorType">
          <hosts>
            <host name="$hostName" description="Test" managementIp="$hostIp"
              username="$hostUsername" password="$hostPassword" />
          </hosts>
          <primaryStorageRef>$nfsPrimaryStorageName</primaryStorageRef>
          <l2NetworkRef>$l2PublicNetworkName</l2NetworkRef>
          <l2NetworkRef>$l2ManagementNetworkName</l2NetworkRef>
          <l2NetworkRef>$l2NoVlanNetworkName1</l2NetworkRef>
          <l2NetworkRef>$l2NoVlanNetworkName2</l2NetworkRef>
          <l2NetworkRef>$l2VlanNetworkName1</l2NetworkRef>
          <l2NetworkRef>$l2VlanNetworkName2</l2NetworkRef>
        </cluster>
      </clusters>
...
      <l2Networks>
        <l2VlanNetwork name="$l2VlanNetworkName1" description="guest l2 vlan network"
          physicalInterface="$l2NetworkPhysicalInterface" vlan="$l2Vlan1">
          <l3Networks>
            <l3BasicNetwork name="$l3VlanNetworkName1" description = "guest test vlan network with DHCP DNS SNAT PortForwarding EIP and SecurityGroup" domain_name="$L3VlanNetworkDomainName1">
              <ipRange name="$vlanIpRangeName1" startIp="$vlanIpRangeStart1" endIp="$vlanIpRangeEnd1"
               gateway="$vlanIpRangeGateway1" netmask="$vlanIpRangeNetmask1"/>
              <dns>$DNSServer</dns>
              <networkService provider="VirtualRouter">
                <serviceType>DHCP</serviceType>
                <serviceType>DNS</serviceType>
                <serviceType>SNAT</serviceType>
                <serviceType>PortForwarding</serviceType>
                <serviceType>Eip</serviceType>
              </networkService>
              <networkService provider="SecurityGroup">
                <serviceType>SecurityGroup</serviceType>
              </networkService>
            </l3BasicNetwork>
          </l3Networks>
        </l2VlanNetwork>
...
the deploying tool is usually invoked by suite setup before running any case. Testers can define variables starting '$' in the XML configuration and resolve variables in a separate property file; by this way, the XML configuration works as a template that can produce different environments; an example of property file looks like:
TEST_ROOT=/usr/local/zstack/root/
zstackPath = $TEST_ROOT/sanitytest/zstack.war
apachePath = $TEST_ROOT/apache-tomcat
zstackPropertiesPath = $TEST_ROOT/sanitytest/conf/zstack.properties
zstackTestAgentPkgPath = $TEST_ROOT/sanitytest/zstacktestagent.tar.gz
masterName = 192.168.0.201
DBUserName = root

node2Name = centos5
node2Ip = 192.168.0.209
node2UserName = root
node2Password = password

node1Name = 192.168.0.201
node1Ip = 192.168.0.201
node1UserName = root
node1Password = password

instanceOfferingName_s = small-vm
instanceOfferingMemory_s = 128M
instanceOfferingCpuNum_s = 1
instanceOfferingCpuSpeed_s = 512

virtualRouterOfferingName_s = virtual-router-vm
virtualRouterOfferingMemory_s = 512M
virtualRouterOfferingCpuNum_s = 2
virtualRouterOfferingCpuSpeed_s = 512

sftpBackupStorageName = sftp
sftpBackupStorageUrl = /export/backupStorage/sftp/
sftpBackupStorageUsername = root
sftpBackupStoragePassword = password
sftpBackupStorageHostname = 192.168.0.220
Note: As you may have guessed, the tool can be used for administrators to deploy a cloud from the XML configuration; and what's more, administrators can do the reverse that dumps a cloud into XML file by zstack-cli -D xml-file-name.
For performance and stress test, the environment usually needs a large number of resources, for example, 100 zones, 1000 clusters. In order to avoid for example manually repeating 1000 lines of cluster definition in the XML configuration, we introduce a propertyduplication that can help create duplicated resources; for example:
...
    <zones>
      <zone name="$zoneName" description="10 same zones" duplication="100">
        <clusters>
          <cluster name="$clusterName_sim" description="10 same Simulator Clusters" duplication="10"
            hypervisorType="$clusterSimHypervisorType">
            <hosts>
              <host name="$hostName_sim" description="100 same simulator Test Host"
                managementIp="$hostIp_sim"
                cpuCapacity="$cpuCapacity" memoryCapacity="$memoryCapacity"
                duplication="100"/>
            </hosts>
            <primaryStorageRef>$simulatorPrimaryStorageName</primaryStorageRef>
            <l2NetworkRef>$l2PublicNetworkName</l2NetworkRef>
            <l2NetworkRef>$l2ManagementNetworkName</l2NetworkRef>
            <l2NetworkRef>$l2VlanNetworkName1</l2NetworkRef>
          </cluster>
...
In the above example, 100 zones, 1000 cluster (100 zones with 10 clusters in each), and 100,000 hosts (1000 cluster with 100 hosts in each) will be created. It saves testers a lot of efforts in preparing an environment for complex performance and stress test.
Modularized Test Cases
Test cases in system testing are highly modularized. Every case essentially performs three steps:
 creating resources to be tested
 validating result
 cleanup
zstack-woodpecker itself provides a comprehensive library helping testers conduct those activities; APIs are well wrapped in a library automatically generated from ZStack source code; testers don't need to write any raw API call. Checkers, which validate test results, are also created for every resource; for example, VM checker, volume checker; testers can easily call those checkers to validate resources they have created without writing tons of lines code; if current checkers cannot satisfy certain situation, testers can also create their own checkers and plug them into the testing framework.
A sample of test case is like:
def test():
    test_util.test_dsc('Create test vm and check')
    vm = test_stub.create_vlan_vm()
    test_util.test_dsc('Create volume and check')
    disk_offering = test_lib.lib_get_disk_offering_by_name(os.environ.get('rootDiskOfferingName'))
    volume_creation_option = test_util.VolumeOption()
    volume_creation_option.set_disk_offering_uuid(disk_offering.uuid)
    volume = test_stub.create_volume(volume_creation_option)
    volume.check()
    vm.check()
    test_util.test_dsc('Attach volume and check')
    volume.attach(vm)
    volume.check()
    test_util.test_dsc('Detach volume and check')
    volume.detach()
    volume.check()
    test_util.test_dsc('Delete volume and check')
    volume.delete()
    volume.check()
    vm.destroy()
    vm.check()
    test_util.test_pass('Create Data Volume for VM Test Success')
Like the integration testing, testers can work out a case with only tens of lines code. The modularity not only helps simplify writing test cases, but also develops a solid base for Model-based testing that we will elaborate in the next article.
Summary
In this article, we introduced our system testing system. By doing more complex tests than real world use cases, the system testing gives us much confidence that how ZStack will perform in real hardware environment, which lets us be able to evolve quickly to a mature product.


 沪公网安备 31011202014879号